This article applies to PRTG Network Monitor 9
Welcome Wizard Help—Cluster Settings
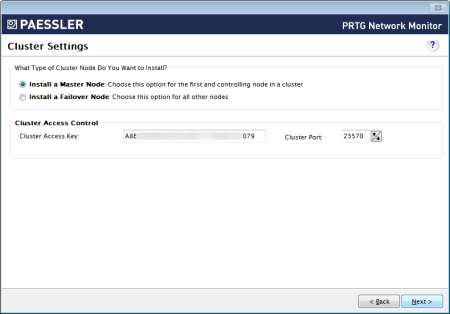
You have chosen to set up a PRTG cluster. Please select whether you want this PRTG installation to be the master node or a failover node.
For detailed instructions on how to set up a PRTG cluster, please see How do I set up a cluster in PRTG?
Install a Master Node
- Make this PRTG installation the master node of your cluster.
- Choose this option if you are about to make the first installation in your cluster.
- The master node usually controls your whole cluster.
- There may only be one master node in a PRTG cluster. Please do not install several master nodes, as they won't be able to connect to each other. Instead, use failover nodes for all other installations in your cluster.
Cluster Access Control (Master)
- Cluster Access Key: For safety reasons, a node can only connect to the cluster with a cluster access key. With the setup of the master node you will define a new key for the cluster here. The access key is already pre-defined; you can leave the default value.
- Cluster Port: All communication in the cluster is directed through the cluster port. It is already pre-defined; you can leave the default value.
- Please make sure the security settings in your network allow communication between all nodes on the defined port.
- Save both cluster access key and cluster port in a text file for later use; you will need them in the cluster settings for each failover node later.
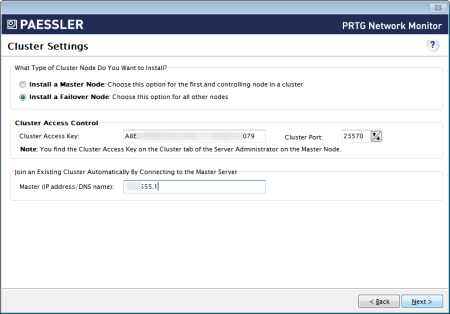
Install a Failover Node
- Make this PRTG installation a failover node in the cluster.
- Choose this option if you have already set up a master node and want to add a failover node to your cluster.
- There may be several failover nodes in one cluster—provided that you have the appropriate license.
Cluster Access Control (Failover)
- Cluster Access Key: For safety reasons, a node can only connect to the cluster with a cluster access key. For a failover node, please enter the existing key you have defined while setting up the master node.
- Cluster Port: All communication in the cluster is directed through the cluster port. It must be the same port defined for the master node.
- Please make sure the security settings in your network allow communication between all nodes on the defined port.
- If unknown, you can look up cluster access key and cluster port in the PRTG Server Administrator program (Cluster tab) on the server your master node is running on.
Join an Existing Cluster Automatically
- This will add the failover node to the master node's settings automatically.
- Master: Enter the IP address or DNS name of the master node in order to join the cluster automatically.
- If you enter nothing here, you'll have to add the master node's IP address or DNS name later in the PRTG Server Administrator program on the server the failover node is running on. For more information, please see Step 3 and following of 10 Steps to Set Up a PRTG Cluster—Scenario 3
- Important: After joining, you must confirm the new node in the master node's settings in order for the failover node to connect to the master node! For more information, please see Step 7 and following of 10 Steps to Set Up a PRTG Cluster—Scenario 3.
See Also
< Welcome Wizard Help—Essential Settings


Add comment