I would like to install and use a GoDaddy SSL certificate in order to avoid the web browser security warning when starting PRTG’s web interface. How can I achieve this?
3 Replies
Votes:
0
This article applies as of PRTG 21
Using a GoDaddyGeneral SSL Certificate with PRTG
General information: Trusted SSL certificates and PRTG
PRTG Network Monitor comes with a default SSL certificate for the PRTG web server. This way, all communication between your browser and PRTG is encrypted via SSL and you can securely use the web interface via HTTPS.
Certificate warnings
This certificate does not match the DNS name (or IP address) of your PRTG installation, so web browsers always show a warning message (The certificate is not correct) when you connect to the PRTG web interface.
The role of SSL certificates
SSL certificates play two roles: First, they encrypt data (for example, passwords from your PRTG installation). Their second role is to ensure that you are actually connected to the correct server (to avoid man-in-the-middle attacks, for example). Traffic encryption starts working immediately after you have finished installing PRTG.
Prerequisites: Install Open SSL
You need to create a Certificate Signing Request (CSR) and a corresponding private key. To create the files with OpenSSL, install these programs first:
- Install the Microsoft Visual C++ 2008 Redistributable Package.
- Install Win64 OpenSSL Light (or the Win32 version, according to your Windows version). OpenSSL installs all files in the C:\Openssl-Win64 folder (or C:\OpenSSL, according to the chosen version).
Step 1: Download the PRTG Certificate Importer
The PRTG Certificate Importer combines and converts all files issued by a certificate authority (CA) automatically for the use with PRTG and saves the certificate files into the correct path on your PRTG server.
Step 2: Create your Certificate Signing Request
- Open a command prompt and navigate to the \bin folder in the OpenSSL directory, for example:
cd c:\openssl-win64\bin - Enter the following command:
openssl req -new -nodes -newkey RSA:2048 -keyout prtg.key -out prtg.csr -config openssl.cfg - Answer the prompted questions.
- Make sure to provide the correct Common Name. This must be the DNS name or IP address that you want to securely use with the PRTG web server.
- Enter a dot for the challenge password. You can do the same for the email address and optional company name.
- Depending on your information, your command prompt should look something like this:
c:\OpenSSL-Win64\bin>openssl req -new -nodes -newkey RSA:2048 -keyout prtg.key -out prtg.csr -config openssl.cfg
Loading 'screen' into random state - done
Generating a 2048 bit RSA private key
............................................+++
..............+++
writing new private key to 'prtg.key'
-----
You are about to be asked to enter information that will be incorporated
into your certificate request.
What you are about to enter is what is called a Distinguished Name or a DN.
There are quite a few fields but you can leave some blank
For some fields there will be a default value,
If you enter '.', the field will be left blank.
-----
Country Name (2 letter code) [AU]:DE
State or Province Name (full name) [Some-State]:Bavaria
Locality Name (eg, city) []:Nuremberg
Organization Name (eg, company) [Internet Widgits Pty Ltd]:Paessler AG
Organizational Unit Name (eg, section) []:IT
Common Name (e.g. server FQDN or YOUR name) []:example.com
Email Address []:info@paessler.com

Please enter the following 'extra' attributes
to be sent with your certificate request
A challenge password []:.
An optional company name []:.

c:\OpenSSL-Win64\bin>
Step 3: Purchase and Request the SSL Certificate
- Go to the GoDaddy web page and navigate to the SSL Certificates.
- Purchase an SSL certificate that suits your needs best. Standard SSL with Single Domain should be fine. A wildcard certificate protects your URL and an unlimited number of its subdomains. See this page for more information.
- Activate the SSL credit. Find detailed instructions here. We summarize and apply the steps to PRTG specific issues in the following.
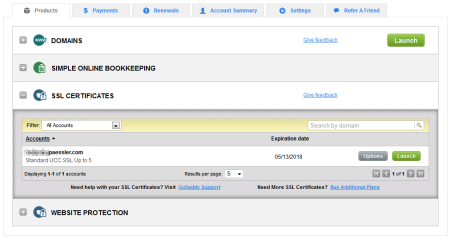
- Log in to your GoDaddy account. Go to Visit My Account and then to the Products tab.
- Click SSL Certificates and on Set Up for the respective credit, which activates it.
- Click Launch for the SSL and open Credits on the left.
- Click Request Certificate.
- Select the appropriate hosting type. For PRTG that is Third Party or Dedicated Server or Virtual Private Server (VPS) without Simple Control Panel.
- Open the prtg.csr file that you created before with a text editor and copy the whole CSR text, including
-----BEGIN CERTIFICATE REQUEST-----and-----END CERTIFICATE REQUEST----- - Paste the CSR into the field which is provided in GoDaddy’s web interface now.
- Finish the request by providing further necessary information. Afterward, the validation process of your application starts.

- GoDaddy's Products Tab with SSL Certificates
Step 4: Preparing the Certificate Files for PRTG
After the validation process has finished, you can find your SSL certificate in your GoDaddy account manager.

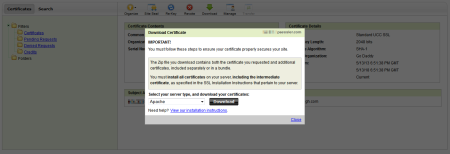
Choose Apache as Server Type
- Open SSL Certificates and click Launch for the created certificate. You see a page with contents and details of the certificate.
- Download the .zip file by clicking the corresponding button in the header bar.
- Select the server type. For PRTG, choose Apache. Click Download and save the .zip file to your system. It contains both the certificate you requested and additional certificates.
- Extract the files to a temporary folder.
- Download and run the PRTG Certificate Importer. This tool automatically combines and converts all certificate files correctly for PRTG. Continue with Step 5.
If you do not use the PRTG Certificate Importer
| Note: We do not recommend that you manually import certificates. Use the PRTG Certificate Importer]] instead. |
If you do not use the PRTG Certificate Importer, you must rename your files:
- The file with common name, i.e., the server FQDN to prtg.crt
- The other file (e.g. gd_bundle) to root.pem
Note: If there are more files than this other file, combine their contents with a text editor to one single file and save it as root.pem
Step 5: Copy the Created Files into the PRTG Program Directory
Use the PRTG Certificate Importer for this step.
- Open the PRTG Certificate Importer and follow the steps there.
- Provide the path to the downloaded certificate files and to the private key (located in the \bin subfolder of OpenSSL).
- Finish if the validation was successful and switch PRTG to a secure HTTPS server.
You can now access your PRTG web interface via HTTPS.
Manual certificate import
For a manual certificate import without using the PRTG Certificate Importer, you must follow the steps below.
| Note: We do not recommend that you manually import certificates. Use PRTG Certificate Importer instead. |
Copy the files you have created to the /cert subfolder of your PRTG installation. Important notice: Make sure to make a copy of the existing PRTG cert files as a backup.
The files you must copy are:
- prtg.key: your private key, located in the \bin subfolder of OpenSSL
- prtg.crt: the certificate of your server
- root.pem: the root certificate(s) of your issuer
Make a backup copy of these files as well before you use them in PRTG.
Step 6: Apply Certificates to PRTG
- Ensure the PRTG web server SSL. You can see this in PRTG Administration Tool | Web Server. Select Secure HTTPS server (Port 443) or Expert configuration: Use SSL encryption to use a secure web server with SSL encryption.
- Restart the PRTG core service and access your PRTG web server via HTTPS.
Troubleshooting
If you cannot start PRTG anymore with the new certificate, try to load the certificate with OpenSSL. See this page for a list of available OpenSSL commands.
If this test works and you did not use the PRTG Certificate Importer but imported the certificate manually, ensure that you created and copied all necessary files into the right folder. Also make sure that your private key is decrypted. You can see this by opening the key file in an editor. If it is not decrypted, there is a line that says that the key is encrypted.
You can also revert to your backed up certificate files.
Created on Sep 26, 2013 12:57:18 PM by
Gerald Schoch [Paessler Support]
Last change on Mar 1, 2022 12:43:42 PM by
Frank Hadasch [Paessler Support]
(0)
●1
Votes:
0
Win64 OpenSSL Lite is no longer available as the website offering it appears to be defunct. I would like to know what is your requirement for using Go Daddy Certificates?
Votes:
0
Hi,
Thank you for your question! The web page Win32 OpenSSL as linked above works without any problems, as well as the download of Win64 OpenSSL Light. Perhaps it was offline only for a short time, so please try again.
Best, Gerald
Add comment