This article applies as of PRTG 22
How to use the SNMP Cisco ASA VPN Traffic sensor with IKEv2
Error code PE123: Workaround
When using the SNMP Cisco ASA VPN Traffic sensor, you may see that establishing the VPN tunnel with IKEv1 works fine whereas IKEv2 gives this error message:
There is no active connection for this remote IP address. The reason might be an issue with Cisco's SNMP component. The data that PRTG receives from the device is incorrect. To resolve this issue, see https://kb.paessler.com/en/topic/59643. (code: PE123)
This seems to be a bug in Cisco’s SNMP component: the data that PRTG receives from the device via SNMP is incorrect. For example, when adding a new sensor, you see that the Remote IP Address is actually your local IP address and that the Sensor Name is the remote IP address. This is also the reason why PRTG sees this as a User to LAN connection. On LAN to LAN, the remote IP address and the sensor name are identical. So far, there is no way to automatically detect this.
To address this issue, Paessler created a device template that you can use to manually add the sensor. Follow the steps below:
- Download the device template here and unzip it to the \devicetemplates subfolder of your PRTG installation.
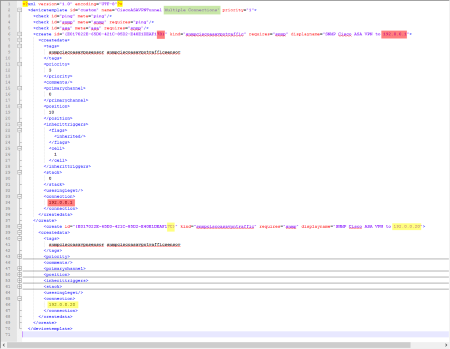
- Open the file with a text editor. Find the three instances of [RemoteIP]. Replace [RemoteIP] (including the brackets) with the actual remote IP address of the VPN connection that you want to monitor.
- In the PRTG web interface, open the device settings and set the Auto-Discovery Level to Auto-discovery with specific device templates.
- A list of device templates appears. Select CiscoASAVPNTunnel [RemoteIP].
- Start the auto-discovery for the device and it adds a sensor for the connection.
If you want to add multiple sensors, you can
- either copy the <create> element and use one per sensor that you want to add,
- or you can add the sensors one after the other, edit the template, and run auto-discovery each time.
In both cases, make sure that you change the id attribute in the <create> element, since there can only be one sensor per device with a specific create-id.
Example: Editing the device template
See the following screenshot for an example of how to edit the template to create multiple (in this case, two) sensors. The sections that you must change in comparison to the original template are highlighted. You must insert the same remote IP address into each <create> element twice. You must also edit the ID.

Click to enlarge.

Add comment