What is this?

This knowledgebase contains questions and answers about PRTG Network Monitor and network monitoring in general.

Learn more

PRTG Network Monitor

Intuitive to Use. Easy to manage.
More than 500,000 users rely on Paessler PRTG every day. Find out how you can reduce cost, increase QoS and ease planning, as well.

Free Download

Top Tags


View all Tags

Polling an Arduino+Ethernet shield with PRTG to create Dashboard

Votes:

0

Hello! I have 2 two questions :

1. I use PRTG for monitor temperature in house, water heading etc.... work great.
On my android tablet have install prtg and i see function "dashboard"
Dashboard show me in full screen mode number of sensor and green checkmark - It means that everything is Ok, and show me number of sensor in pause. Thats all ok, but I do not need this , but the value of each sensor.

I read all about maps but it seems to me that it is not for this.

All i need is value for each sensor ( which I choice ) in android tablet in full screen mode.
I used to it instead of a room thermostat with display to see all sensor value :)

How can I change this display?

2. ARDUINO and temperature sensor DS18B20 Has anyone managed to get the SNMP OID values from the Arduino sensor to show value in PRTG ??

On Arduino uno with ethernet shiels want to install the various sensors, and read the value on PRTG server ....

Thank you for your help and Greetings from Ljubljana !

Damjan

android-tablet arduino snmp temperature-sensor

Created on Sep 5, 2016 10:15:29 AM

Last change on Oct 11, 2016 6:45:05 AM by  Luciano Lingnau [Paessler]


Best Answer

Accepted Answer

Votes:

5

I want to share CODE for Arduino uno with Ethernet shield web page for temperature monitor.
( 3 DS18B20 sensors and 1 DHT22 )
In PRTG i use HTTP Content Sensor with 5 number of channel.

Code :

#include <DHT.h>
#define DHTPIN 3     // connecting DHT sensor pin to pin 2 on our Arduino
#define DHTTYPE DHT22   // we are using DHT sensor 22
DHT dht(DHTPIN, DHTTYPE);
#include <SPI.h>
#include <Ethernet.h>
#include <LiquidCrystal.h> 
#include <OneWire.h>
#include <DallasTemperature.h>
#include <Wire.h>
#define ONE_WIRE_BUS 2 //definiramo pin, na katerega so priklučeni senzorju DS18B20
OneWire oneWire(ONE_WIRE_BUS);
DallasTemperature sensors(&oneWire);

DeviceAddress Thermometer1 = { 0x28, 0x80, 0xD3, 0x1E, 0x00, 0x00, 0x80, 0x45 };//ok
DeviceAddress Thermometer2 = { 0x28, 0xFF, 0x47, 0xA3, 0x71, 0x16, 0x05, 0xEC };//ok
DeviceAddress Thermometer3 = { 0x28, 0xB1, 0xEE, 0x1E, 0x00, 0x00, 0x080, 0xF7 };//ok


LiquidCrystal lcd(3, 4, 5, 6, 7, 8); //the pins used for the lcd display
byte mac[] = { 0xDE, 0xAD, 0xBE, 0xEF, 0xFE, 0xEC }; //mac address of ethernet shield
IPAddress ip(192,168,5,90); // ip address of ethernet shield
EthernetServer server(80); //sets the port for the ethernet shield- eg: port 80 http

void setup() {
  Serial.begin(9600);
  lcd.begin(16, 2); // change this back to 16, 2
  dht.begin();
  Ethernet.begin(mac, ip);
  server.begin();
  Serial.print("Server address:"); //prints server address to serial connection
  Serial.println(Ethernet.localIP());
}


void loop() { 
  delay(2000);
  float h = dht.readHumidity();
  float t = dht.readTemperature(); 
  float temp1 = sensors.getTempC(Thermometer1);
  float temp2 = sensors.getTempC(Thermometer1);
  float temp3 = sensors.getTempC(Thermometer1);
    if (isnan(t) || isnan(h)) {
    Serial.println("Count not detect sensor");
  } else { //prints sensor output to lcd and serial monitor
    lcd.setCursor(0, 0);
    lcd.print("Temp: ");
    lcd.setCursor(10, 0);
    lcd.print(t);
    lcd.setCursor(0, 1);
    lcd.print("Humidity: ");
    lcd.setCursor(10, 1);
    lcd.print(h);
     Serial.print('\n');
    Serial.print("Senzor DHT 22 - PIN 3");
    Serial.print('\n');
    Serial.print("Vlaznost: ");
    Serial.print(h);
    Serial.print(" %\t");
     Serial.print('\n');
    
    Serial.print("Temperatura: ");
    Serial.print(t);
    Serial.println(" *C");
    Serial.print('\n');
    
    Serial.print("Senzorji DS18B20 - PIN 2 ");
    Serial.print('\n');
    Serial.print("Temperature 1: ");
Serial.println(temp1);
Serial.print("Temperature 2: ");
Serial.println(temp2);
Serial.print("Temperature 3: ");
Serial.println(temp3);
Serial.print("--------------------------------- ");
Serial.print("ponovno berem temperaturo..... ");
 Serial.print('\n');
  }

  EthernetClient client = server.available();
  if (client) {
    Serial.println("new client");
    boolean blankLine = true;
    while (client.connected()) {
      if (client.available()) {
        char c = client.read();
        Serial.write(c);
        if (c == '\n' && blankLine) { //initializing HTTP
   client.println("HTTP/1.1 200 OK");
   client.println("Content-Type: text/html");
   client.println("Connection: close");  // the connection will be closed after completion of the response
   client.println("Refresh: 5");  // refresh the page automatically every 5 sec
   client.println();
   client.println("<!DOCTYPE HTML>");
   client.println("<html>");
     client.println("<center>");
     client.println("<H1>");
     client.println("Current Readings:");
     client.println("</H1>");
       client.println("<H2>");
         client.println("Temperature: ");
       client.println("</H2>");
       client.println("<H1>");
         client.print("[");
         client.print(t);
         client.println("] &#176;");
         client.println("C");
       client.println("</H1>");
       client.println("<br />");
       client.println("<H2>");
         client.println("Humidity: ");
       client.println("</H2>");
       client.println("<p />");
       client.println("<H1>");
         client.print("[");
         client.print(h);
         client.print("] %\t");
       client.println("</H1>");
       client.println("<p />"); 
     client.println("</center>");
   client.println("</html>");
   sensors.requestTemperatures(); //Get temperature of all sensors
   
    client.print ("<font color=black size=7>");
    client.println("<br />");
    client.print ("<font color=black size=7>");
    client.print("Senzor 1: ");
    client.print("[");
    client.print(sensors.getTempC(Thermometer1)); //print temperature from DS18x20 sensor
    client.println("] &#176;");
    client.println("C");
    client.print ("<font color=green size=7>");

    client.print ("<font color=black size=7>");
    client.println("<br />");
    client.print ("<font color=black size=7>");
    client.print("Senzor 2: ");
    client.print("[");
    client.print(sensors.getTempC(Thermometer2)); //print temperature from DS18x20 sensor
    client.println("] &#176;");
    client.println("C");
    client.print ("<font color=green size=7>");

    client.print ("<font color=black size=7>");
    client.println("<br />");
    client.print ("<font color=black size=7>");
    client.print("Senzor 3: ");
    client.print("[");
    client.print(sensors.getTempC(Thermometer3)); //print temperature from DS18x20 sensor
    client.println("] &#176;");
    client.println("C");
    client.print ("<font color=green size=7>");
          break;
        }
        if (c == '\n') {
          blankLine = true;
        }
        else if (c != '\r') {
          blankLine = false;
        }
      }
    }
    delay(1);
    client.stop();
    Serial.println("Disonnected");
  }
}

Regards , Damjan


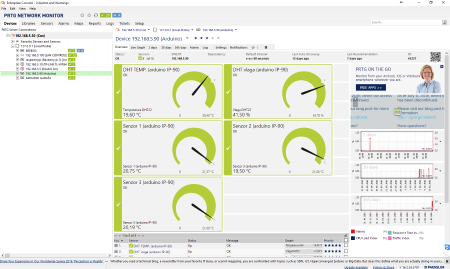
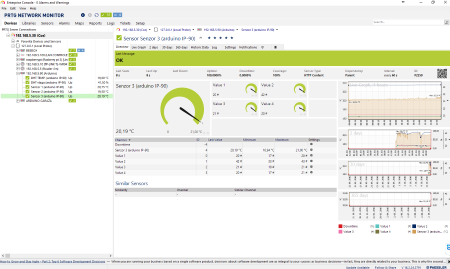
Screenshots
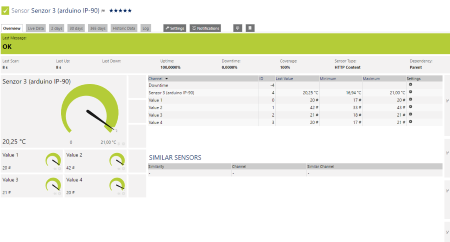
HTTP Content for Arduino with 5 Channels
Click here to enlarge.

5 Arduino Temperature Sensors
Click here to enlarge.

Arduino Temperature Sensor EC
Click here to enlarge.

Created on Oct 10, 2016 1:28:34 PM

Last change on Oct 14, 2016 1:34:16 PM by  Gerald Schoch [Paessler Support]


5 Replies

Votes:

0

Hello Damjan from Ljubljana,
we appreciate your post.

I'll address each inquiry individually:

1. I use PRTG for monitor temperature in house, water heading etc.... work great. On my android tablet have install prtg and i see function "dashboard" Dashboard show me in full screen mode number of sensor and green checkmark - It means that everything is Ok, and show me number of sensor in pause. Thats all ok, but I do not need this , but the value of each sensor. I read all about maps but it seems to me that it is not for this. All i need is value for each sensor ( which I choice ) in android tablet in full screen mode. I used to it instead of a room thermostat with display to see all sensor value :) How can I change this display?

Via maps you won't even have to install the App on the phone, simply access the "correct" public URL of the map in the phone's browser. As for only seeing the values, you need to use a map-object that shows only the required information, there are several map-objects that will show only the value/last message. Please review module 8 from our e-learning site.


2. ARDUINO and temperature sensor DS18B20 Has anyone managed to get the SNMP OID values from the Arduino sensor to show value in PRTG ?? On Arduino uno with ethernet shiels want to install the various sensors, and read the value on PRTG server ....

Consider that SNMP may be rather complex to implement on the Arduino, for such network-connected solutions I also advise you to check the ESP8266 as an interesting iot alternative. As for making the "values" from sensors available, the simplest way is via HTTP and then implementing the HTTP Data Advanced sensors in PRTG.

This sensor works by making the readings of the readings/values available in an XML document compliant with PRTG's API for custom sensors. It allows you to easily deploy multi-channel sensors via a single URL and doesn't require you to implement an SNMP Agent, simply a webserver which is far more common/widespread. Please check the example xml/json that the sensor can read:

Best Regards,
Luciano Lingnau [Paessler Support]

Created on Sep 6, 2016 11:57:06 AM by  Luciano Lingnau [Paessler]

Last change on Aug 10, 2018 9:41:25 AM by  Brandy Greger [Paessler Support]


Accepted Answer

Votes:

5

I want to share CODE for Arduino uno with Ethernet shield web page for temperature monitor.
( 3 DS18B20 sensors and 1 DHT22 )
In PRTG i use HTTP Content Sensor with 5 number of channel.

Code :

#include <DHT.h>
#define DHTPIN 3     // connecting DHT sensor pin to pin 2 on our Arduino
#define DHTTYPE DHT22   // we are using DHT sensor 22
DHT dht(DHTPIN, DHTTYPE);
#include <SPI.h>
#include <Ethernet.h>
#include <LiquidCrystal.h> 
#include <OneWire.h>
#include <DallasTemperature.h>
#include <Wire.h>
#define ONE_WIRE_BUS 2 //definiramo pin, na katerega so priklučeni senzorju DS18B20
OneWire oneWire(ONE_WIRE_BUS);
DallasTemperature sensors(&oneWire);

DeviceAddress Thermometer1 = { 0x28, 0x80, 0xD3, 0x1E, 0x00, 0x00, 0x80, 0x45 };//ok
DeviceAddress Thermometer2 = { 0x28, 0xFF, 0x47, 0xA3, 0x71, 0x16, 0x05, 0xEC };//ok
DeviceAddress Thermometer3 = { 0x28, 0xB1, 0xEE, 0x1E, 0x00, 0x00, 0x080, 0xF7 };//ok


LiquidCrystal lcd(3, 4, 5, 6, 7, 8); //the pins used for the lcd display
byte mac[] = { 0xDE, 0xAD, 0xBE, 0xEF, 0xFE, 0xEC }; //mac address of ethernet shield
IPAddress ip(192,168,5,90); // ip address of ethernet shield
EthernetServer server(80); //sets the port for the ethernet shield- eg: port 80 http

void setup() {
  Serial.begin(9600);
  lcd.begin(16, 2); // change this back to 16, 2
  dht.begin();
  Ethernet.begin(mac, ip);
  server.begin();
  Serial.print("Server address:"); //prints server address to serial connection
  Serial.println(Ethernet.localIP());
}


void loop() { 
  delay(2000);
  float h = dht.readHumidity();
  float t = dht.readTemperature(); 
  float temp1 = sensors.getTempC(Thermometer1);
  float temp2 = sensors.getTempC(Thermometer1);
  float temp3 = sensors.getTempC(Thermometer1);
    if (isnan(t) || isnan(h)) {
    Serial.println("Count not detect sensor");
  } else { //prints sensor output to lcd and serial monitor
    lcd.setCursor(0, 0);
    lcd.print("Temp: ");
    lcd.setCursor(10, 0);
    lcd.print(t);
    lcd.setCursor(0, 1);
    lcd.print("Humidity: ");
    lcd.setCursor(10, 1);
    lcd.print(h);
     Serial.print('\n');
    Serial.print("Senzor DHT 22 - PIN 3");
    Serial.print('\n');
    Serial.print("Vlaznost: ");
    Serial.print(h);
    Serial.print(" %\t");
     Serial.print('\n');
    
    Serial.print("Temperatura: ");
    Serial.print(t);
    Serial.println(" *C");
    Serial.print('\n');
    
    Serial.print("Senzorji DS18B20 - PIN 2 ");
    Serial.print('\n');
    Serial.print("Temperature 1: ");
Serial.println(temp1);
Serial.print("Temperature 2: ");
Serial.println(temp2);
Serial.print("Temperature 3: ");
Serial.println(temp3);
Serial.print("--------------------------------- ");
Serial.print("ponovno berem temperaturo..... ");
 Serial.print('\n');
  }

  EthernetClient client = server.available();
  if (client) {
    Serial.println("new client");
    boolean blankLine = true;
    while (client.connected()) {
      if (client.available()) {
        char c = client.read();
        Serial.write(c);
        if (c == '\n' && blankLine) { //initializing HTTP
   client.println("HTTP/1.1 200 OK");
   client.println("Content-Type: text/html");
   client.println("Connection: close");  // the connection will be closed after completion of the response
   client.println("Refresh: 5");  // refresh the page automatically every 5 sec
   client.println();
   client.println("<!DOCTYPE HTML>");
   client.println("<html>");
     client.println("<center>");
     client.println("<H1>");
     client.println("Current Readings:");
     client.println("</H1>");
       client.println("<H2>");
         client.println("Temperature: ");
       client.println("</H2>");
       client.println("<H1>");
         client.print("[");
         client.print(t);
         client.println("] &#176;");
         client.println("C");
       client.println("</H1>");
       client.println("<br />");
       client.println("<H2>");
         client.println("Humidity: ");
       client.println("</H2>");
       client.println("<p />");
       client.println("<H1>");
         client.print("[");
         client.print(h);
         client.print("] %\t");
       client.println("</H1>");
       client.println("<p />"); 
     client.println("</center>");
   client.println("</html>");
   sensors.requestTemperatures(); //Get temperature of all sensors
   
    client.print ("<font color=black size=7>");
    client.println("<br />");
    client.print ("<font color=black size=7>");
    client.print("Senzor 1: ");
    client.print("[");
    client.print(sensors.getTempC(Thermometer1)); //print temperature from DS18x20 sensor
    client.println("] &#176;");
    client.println("C");
    client.print ("<font color=green size=7>");

    client.print ("<font color=black size=7>");
    client.println("<br />");
    client.print ("<font color=black size=7>");
    client.print("Senzor 2: ");
    client.print("[");
    client.print(sensors.getTempC(Thermometer2)); //print temperature from DS18x20 sensor
    client.println("] &#176;");
    client.println("C");
    client.print ("<font color=green size=7>");

    client.print ("<font color=black size=7>");
    client.println("<br />");
    client.print ("<font color=black size=7>");
    client.print("Senzor 3: ");
    client.print("[");
    client.print(sensors.getTempC(Thermometer3)); //print temperature from DS18x20 sensor
    client.println("] &#176;");
    client.println("C");
    client.print ("<font color=green size=7>");
          break;
        }
        if (c == '\n') {
          blankLine = true;
        }
        else if (c != '\r') {
          blankLine = false;
        }
      }
    }
    delay(1);
    client.stop();
    Serial.println("Disonnected");
  }
}

Regards , Damjan


Screenshots

HTTP Content for Arduino with 5 Channels
Click here to enlarge.

5 Arduino Temperature Sensors
Click here to enlarge.

Arduino Temperature Sensor EC
Click here to enlarge.

Created on Oct 10, 2016 1:28:34 PM

Last change on Oct 14, 2016 1:34:16 PM by  Gerald Schoch [Paessler Support]


Votes:

2

Hello svedr,
this is awesome!

Do you have any screenshots of the dashboards/sensors to share?

I would like to suggest only one improvement which shouldn't be hard to implement(If the Arduino's webserver can handle it) :

  • Improve the format of the response to make it compatible with the HTTP Data Advanced sensor. Essentialy, the client.print part has to be modified to "spit out" XML-encoded channels, something like:
<?xml version="1.0" encoding="utf-8" ?>
<prtg>

<result>
<channel>DHT Humidity</channel>
<value>12.34</value>
<float>1</float>
<unit>custom</unit>
<customunit>#</customunit>
</result>

<result>
<channel>DHT Temperature</channel>
<value>12.34</value>
<float>1</float>
<unit>custom</unit>
<customunit>Cº</customunit>
</result>

<result>
<channel>Temperature 1</channel>
<value>12.34</value>
<float>1</float>
<unit>custom</unit>
<customunit>Cº</customunit>
</result>

<result>
<channel>Temperature 2</channel>
<value>12.34</value>
<float>1</float>
<unit>custom</unit>
<customunit>Cº</customunit>
</result>

<result>
<channel>Temperature 3</channel>
<value>12.34</value>
<float>1</float>
<unit>custom</unit>
<customunit>Cº</customunit>
</result>

<text>The sensor's message</text>
</prtg>

This way the sensor can be deployed using only a single URL, and all units and data types will be set automatically. This is specially relevant if you intend to deploy several of these devices to monitor a large area. More details about the API for custom sensors is available here:

Best Regards,
Luciano Lingnau [Paessler Support]

Created on Oct 11, 2016 6:39:41 AM by  Luciano Lingnau [Paessler]


Votes:

0

Here's my sreenshoot.

The only problem with HTTP Content sensor is independence for all value from http. When create new HTTP Content channel, you have 1 primary and 4 unnecessary values which I do not like. I like 5 independence channel , what I think it is not possible.

Can you send me the entire modified code?

If i delete lines "client.print" and paste your code not work. ( errors in code )

Regards, Damjan

Created on Oct 12, 2016 10:22:39 AM

Last change on Oct 12, 2016 10:35:16 AM by  Luciano Lingnau [Paessler]


Votes:

0

Hello Damjan,
thank you for your reply.

Unfortunately I don't have any device here to test the code on, so I can't share any modified code, but it should be possible to do something like this (for each channel in the result):

client.println("<prtg>");

client.println("<result>");
client.println("<channel>Senzor 2</channel>");
client.print("<value>");
client.print(sensors.getTempC(Thermometer2));
client.println("</value>");
client.println("<float>1</float>");
client.println("<unit>custom</unit>");
client.println("<customunit>Celsius</customunit>");
client.println("</result>");

client.println("</prtg>");


Best Regards,
Luciano Lingnau [Paessler Support]

Created on Oct 14, 2016 12:52:26 PM by  Luciano Lingnau [Paessler]


Disclaimer: The information in the Paessler Knowledge Base comes without warranty of any kind. Use at your own risk. Before applying any instructions please exercise proper system administrator housekeeping. You must make sure that a proper backup of all your data is available.