I have a device with Sigfox connectivity that measures temperature and humidity using callbacks. How can I monitor these with PRTG?
1 Reply
Votes:
0
This article applies as of PRTG 22
Monitoring Sigfox callbacks with PRTG
| Important notice: This article describes how to manually create Sigfox callbacks and decode the respective payload data. If you want to decode Sigfox payloads in a much faster and easier way, try out the new Paessler BitDecoder. |
With PRTG, you can monitor Sigfox callbacks out of the box with the HTTP IoT Push Data Advanced sensor. You can use this sensor to monitor measurements such as temperature and humidity with PRTG.
Note: In the following examples, we used a device like Sens'it.
Create an HTTP IoT Push Data Advanced sensor
The first step to monitoring Sigfox callbacks is to add an HTTP IoT Push Data Advanced sensor to your PRTG installation.
- Create a new device or use an existing device (for example, with IP address 127.0.0.1).
- Add an HTTP IoT Push Data Advanced sensor to the device.
- In the sensor settings, set the Scanning Interval according to the device transmit interval, for example 15 minutes.
- Note the SSL Port 5051 and the Identification Token, you need both values when setting up your Sigfox callback configuration, so copy them.
Create a Sigfox callback
The next step to monitoring Sigfox callbacks is to create the corresponding callback in the Sigfox interface.
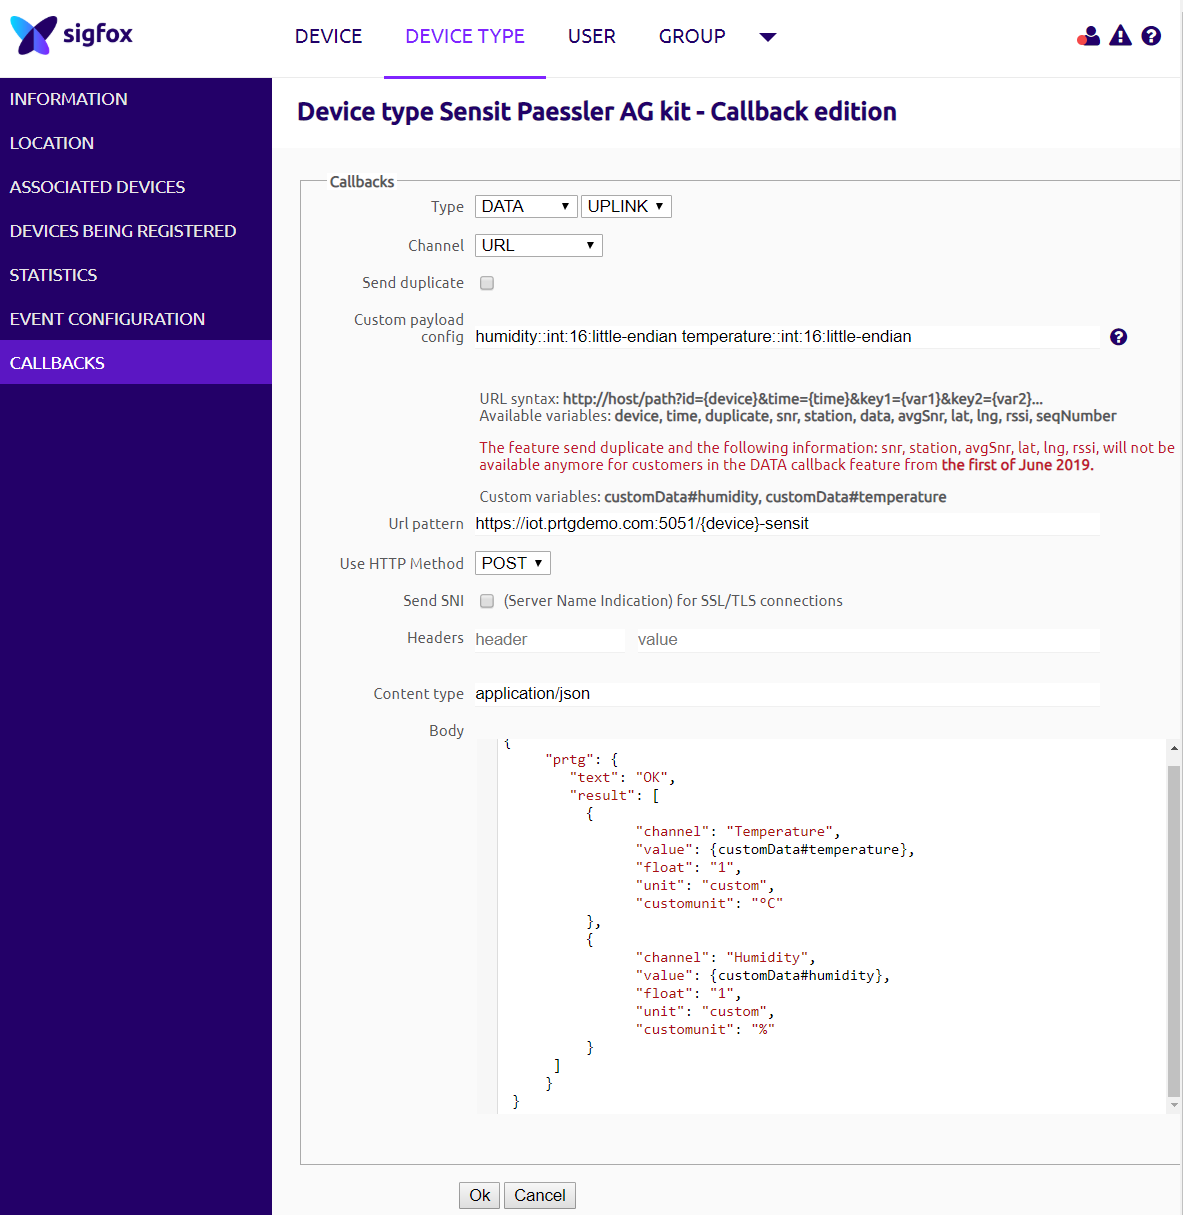
- Open Callbacks.
- Select the Device Type tab.
- Under Type, select Data and Uplink.
- Under Custom payload config, enter the following
humidity::int:16:little-endian temperature::int:16:little-endianNote: The custom payload config is important for decoding purposes. For the values to be properly displayed in PRTG, they must be decoded.
- Under URL pattern, enter the URL in the following format.
https://<PRTG IP>:5051/<Sensor-specific identification token>Note: You can reference the Sigfox Id as {device} in your push identification token.
- In the URL, replace
- <PRTG IP> with the IP address of the system on which your PRTG probe with the HTTP IoT Push Data Advanced sensor is running.
- <Sensor-specific identification token> with the Identification Token that you defined in the sensor settings.
- Select POST as HTTP method.
- Change the Content type to application/json
- Add the following JSON to the Body field
{
     "prtg": {
        "text": "OK",
        "result": [
          {
                "channel": "Temperature",
                "value": {customData#temperature},
                "float": "1",
                "unit": "custom",
                "customunit": "°C"
          },
          {
                "channel": "Humidity",
                "value": {customData#humidity},
                "float": "1",
                "unit": "custom",
                "customunit": "%"
          }
      ]
     }
 }
Note: The {customData#NAME} pattern references the named values you defined in the Custom payload config field. Please see PRTG Manual: Custom Sensors for an explanation of all possible JSON properties.
- Click Ok to save the callback.
Optional: decode the callback data
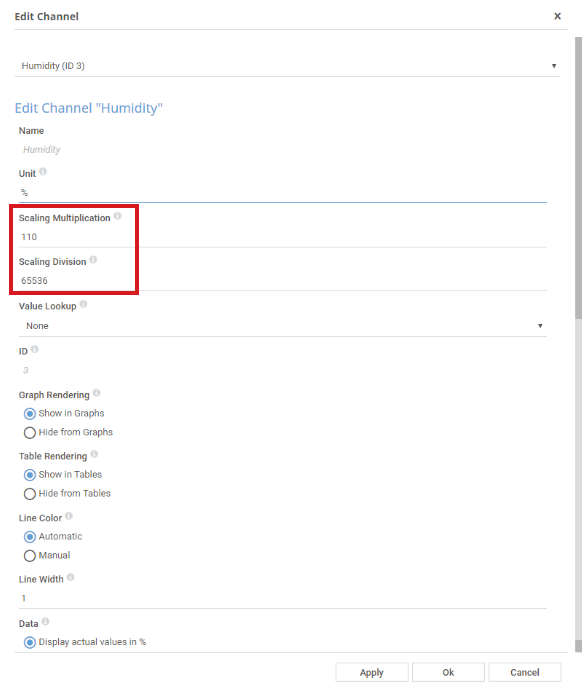
After the first successful push from your Sigfox callback to your HTTP IoT Push Data Advanced sensor, the channels will appear in your sensor as defined by the JSON body payload. You can now edit the channels and adjust the scaling factors.
Because there is a Sigfox transmit limitation of 12 bytes, manufacturers often convert values, for example from float to integer, to make them smaller. For these values to be properly displayed in PRTG, they must be returned to their original format using scaling.
When decoding values that were converted from float to integer, the scaling needs to be configured as follows in the respective channel's settings.
Note: The values in the screenshot are just examples. The type of conversion that is used varies from manufacturer to manufacturer. See your manufacturer's documentation for details.
More
Created on Jul 3, 2018 1:35:29 PM by
Brandy Greger [Paessler Support]
Last change on Jan 5, 2023 7:59:05 AM by
Brandy Greger [Paessler Support]


Add comment