I would like to monitor my IoT and IIoT environments with PRTG to have an overview of all my IoT devices and IoT data. Is there a way to integrate my IoT devices into PRTG using Node-RED?
1 Reply
Votes:
0
This article applies as of PRTG 22
Integrating IoT devices into PRTG with the PRTG Node-RED Connector
With the native PRTG Node-RED Connector, you can integrate, for example, your IoT devices and IoT data from your automation and manufacturing processes, your environmental monitoring devices, and much more, into PRTG via Node-RED. Take the following steps to set up your monitoring.
Step 1: Set up Node-RED in Microsoft Windows
Node-RED is an open-source programming tool that brings together IoT devices, APIs, and online services. To use the PRTG Node-RED Connector, you need to install and run Node-RED first.
Step 2: Create an HTTP IoT Push Data Advanced sensor in PRTG
The next step to monitoring your IoT environment is to add an HTTP IoT Push Data Advanced sensor to your PRTG installation.
- Create a new device or use an existing device with the IP address of your probe system, for example, localhost, or the DNS name of your PRTG Hosted Monitor instance.
- Add an HTTP IoT Push Data Advanced sensor to the device.
- In the sensor settings, note the TLS Port 5051 and the Identification Token. You need both values when configuring your prtg-connector nodes in the PRTG Node-RED Connector (see Step 4: Configure your prtg-connector nodes).
Note: You can define your own identification token or use the token that is automatically generated when adding the sensor.
Step 3: Install the PRTG Node-RED Connector
You can install the PRTG Node-RED Connector free of charge via GitHub, the Node-RED palette, or npm.
- Installation via GitHub:
npm i git+https://github.com/PaesslerAG/node-red-contrib-prtg.git - Installation via Node-RED:
Search for paesslerag-node-red-contrib-prtg under Manage palette -> Install - Installation via npm:
npm i paesslerag-node-red-contrib-prtg
Step 4: Configure your prtg-connector nodes
In the last step, you need to configure your prtg-connector nodes to point to your PRTG installation.
- Click
 to add a new PRTG Connection.
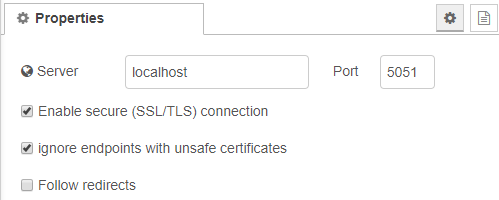
- Enter a Server and Port. The server must be the IP address or DNS name of the probe system with the HTTP IoT Push Data Advanced sensor. The port number must be 5051, which corresponds to the TLS Port defined in the sensor settings (see Step 2: Create an HTTP IoT Push Data Advanced sensor in PRTG).
- Enable the check box next to Enable secure (SSL/TLS) connection and Ignore endpoints with unsafe certificates. Disable the check box next to Follow redirects.
- Click Add to confirm.

Click to enlarge.
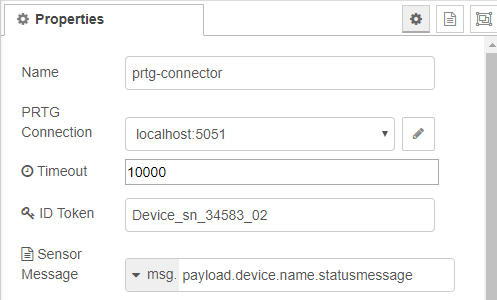
- As ID Token, enter the Identification Token shown in the sensor settings of the HTTP IoT Push Data Advanced sensor (see Step 2: Create an HTTP IoT Push Data Advanced sensor in PRTG).
- For Sensor Message, enter the path of your input message starting with msg. The prtg-connector node transforms this message payload to the format for custom sensors in PRTG, and sends an HTTP POST request to the probe system with the HTTP IoT Push Data Advanced sensor.

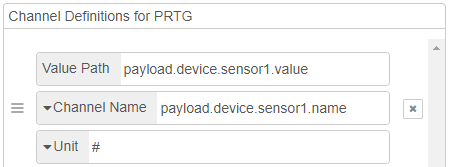
Click to enlarge. - Under Channel Definitions for PRTG, enter a Channel Name, that is, the name of a channel of the HTTP IoT Push Data Advanced sensor in PRTG. As Unit, enter the custom unit name for the according channel. This can be a string or a placeholder.

Click to enlarge. - Click Done to save your configuration.
You have successfully integrated your IoT device into PRTG using Node-RED and the PRTG Node-RED Connector.
Created on Feb 26, 2020 7:17:07 AM by
Maike Guba [Paessler Support]
(2,404)
●2
●1
Last change on Jan 5, 2023 8:18:14 AM by
Brandy Greger [Paessler Support]

Add comment