This article applies as of PRTG 22
Credentials for Microsoft Entra ID related to the Microsoft Azure sensors
Before you can set up Microsoft Azure sensors, you need to define credentials for Microsoft Azure in settings that are higher in the object hierarchy, for example, in the settings of the parent device.
The credentials you need are the Tenant ID, the Client ID, the Client Secret, and the Subscription ID. You obtain all of these credentials in the Microsoft Azure Portal or in the Microsoft Entra admin center.
Log in to the Microsoft Azure Portal or the Microsoft Entra admin center and follow the next steps:
- Step 1: Get the client ID and the tenant ID
- Step 2: Get the client secret
- Step 3: Get the subscription ID
Step 1: Get the client ID and the tenant ID
You can use either the Azure Portal or the Microsoft Entra admin portal. The only difference is how you navigate to App registrations:
Using the Azure Portal: Open Microsoft Entra ID in the Microsoft Azure Portal and go to the App registrations tab.
Using the Microsoft Entra admin center: Go to the App registrations tab under Applications.
- Click New registration to open the Register an application dialog.
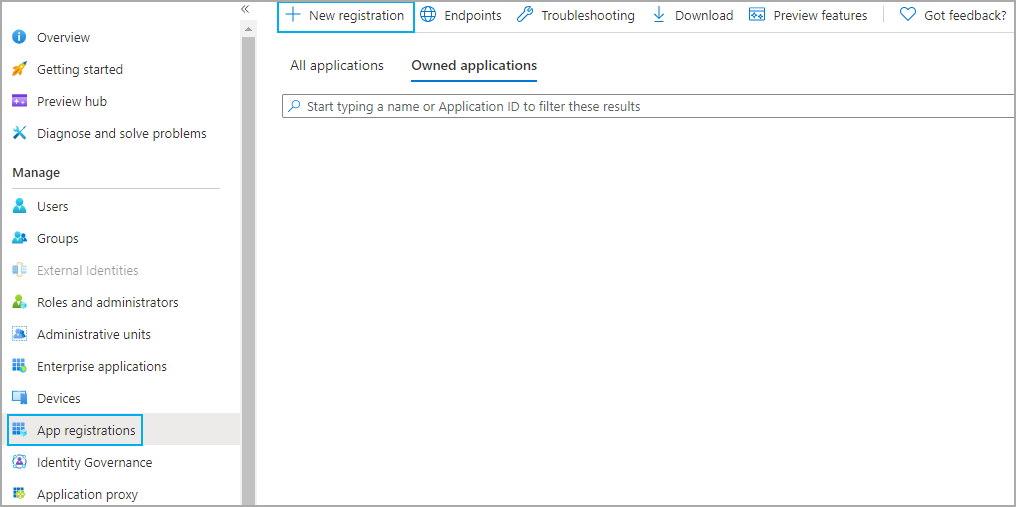
Click to enlarge. .
- Enter a display name, for example, Microsoft Azure PRTG.
- Leave all other settings as they are.
- Enter the redirect URI where the authorization server sends you after the registration and authorization of the app. This is required for most authentication scenarios and can be specific for your setup. Note that there are specific rules for the redirect URI.
Enter https://login.windows.net if you have no specific redirect URI.
- Click Register to register the new application. The Overview tab of the newly registered application opens.

Click to enlarge.
- Copy the Application (client) ID and the Directory (tenant) ID. These are the client ID and the tenant ID that you need to enter in PRTG.
Step 2: Get the client secret
Take the following steps to create an application password, also known as client secret.
- Go to the Certificates & secrets tab.
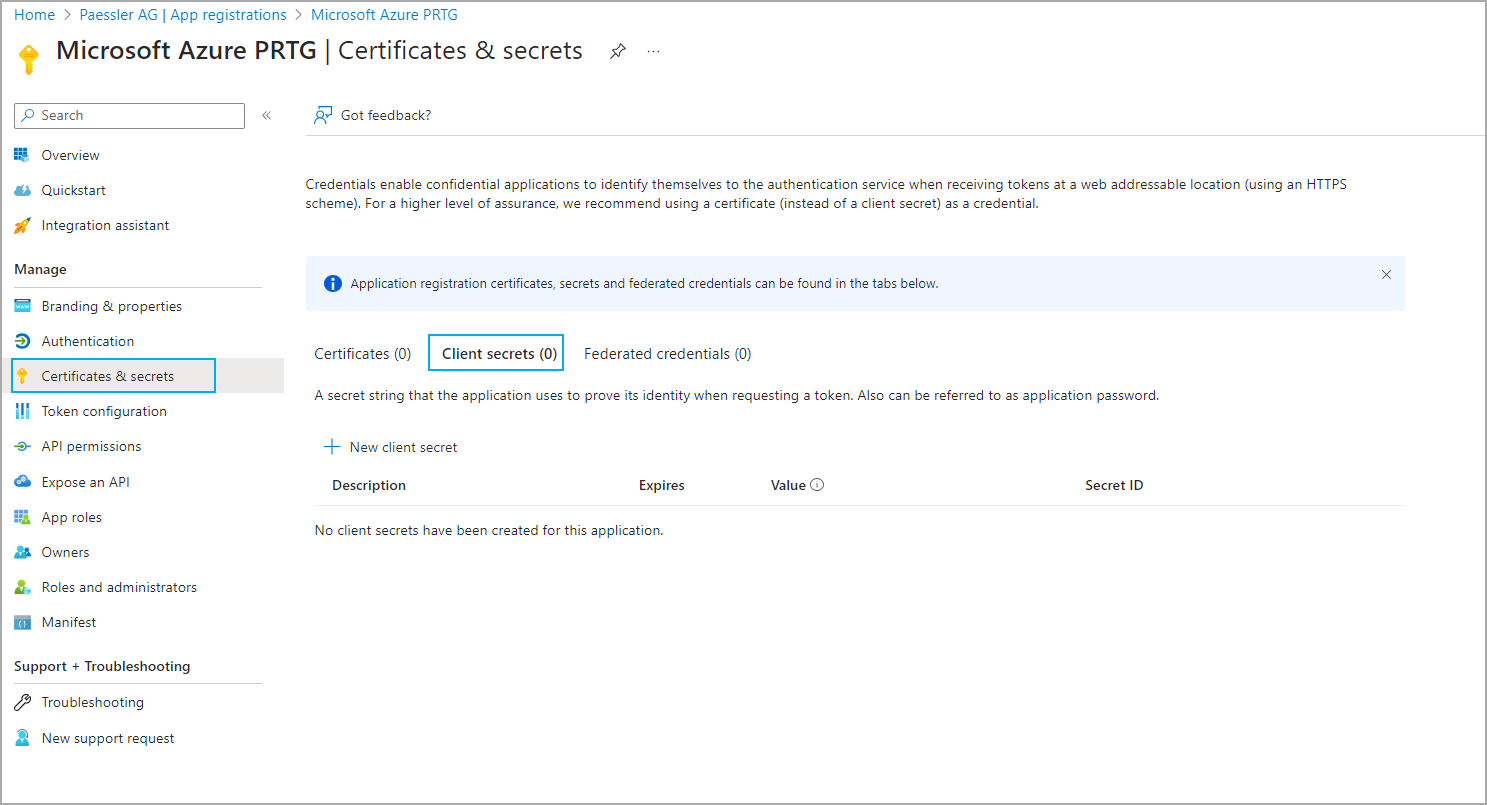
Click to enlarge.
- Click New client secret to open the Add a client secret dialog.
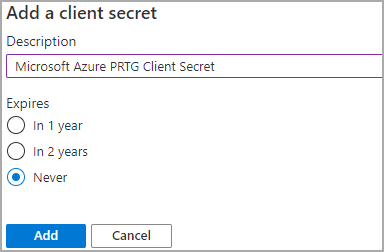
Click to enlarge.
- Enter a Description, for example, Microsoft 365 Client Secret.
- Select a period after which the client secret expires.
- Click Add to create and display the new client secret for your application.

Click to enlarge.
- Copy the client secret to enter it in PRTG.
Note: Make sure that you directly copy the client secret after you created it. If you leave the page, the client secret is not shown anymore. You have to create a new client secret.
Step 3: Get the subscription ID
Take the following steps to find your Azure subscription ID.
- Navigate to Subscriptions in the Microsoft Azure Portal.
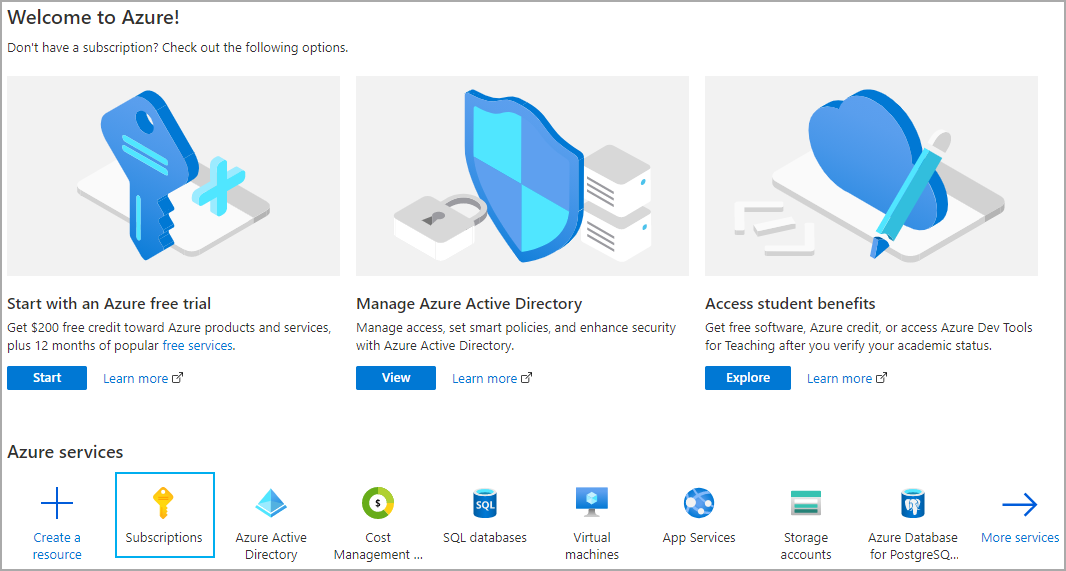
Click to enlarge.
- Find the Subscription ID for your subscription here:

Click to enlarge.
Roles and permissions for the Microsoft Azure sensors
The Microsoft Azure sensors need sufficient rights to query the respective data. You need to create Azure custom roles with the required permissions in the Azure Management Portal and assign these roles to your newly created application.
Prerequisites
Before you can create a custom role, you need to create a .json file that includes the required permissions for the sensor that you want to add. You can find the JSON for each Microsoft Azure sensor at the end of this article. Save the .json file to your system.
Log in to the Microsoft Azure Portal under https://portal.azure.com and follow
- Step 1: Create a custom role
- Step 2: Assign a role
Step 1: Create a custom role
- Navigate to Subscriptions in the Microsoft Azure Portal.
- Select the subscription for which you want to create the custom role.
- Go to the Access control (IAM) tab.

Click to enlarge.
- Select the Roles tab.
- Click Add and select Add custom role from the dropdown menu.

Click to enlarge.
The Create a custom role dialog opens.
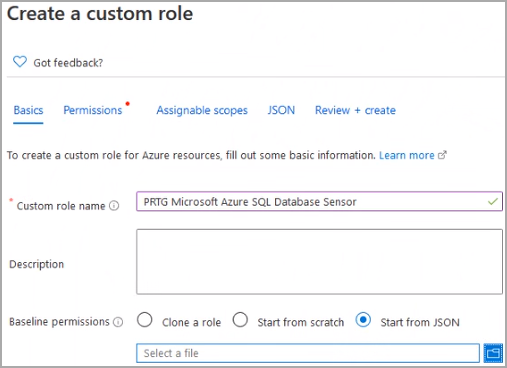
Click to enlarge.
- Enter a Custom role name to identify the role, for example, PRTG Microsoft Azure SQL Database Sensor.
- Optionally, enter a Description.
- For Baseline permissions, select Start from JSON and browse for the JSON file that you created earlier.
- Click Next.
- On the Assignable scopes tab, you can see the ID of the subscription for which you want to add a custom role. If you want to add the custom roles to other subscriptions, too, click Add assignable scopes and follow the steps there.

Click to enlarge.
- Click Next.
- On the JSON tab, you can see the custom role in JSON format that you uploaded.
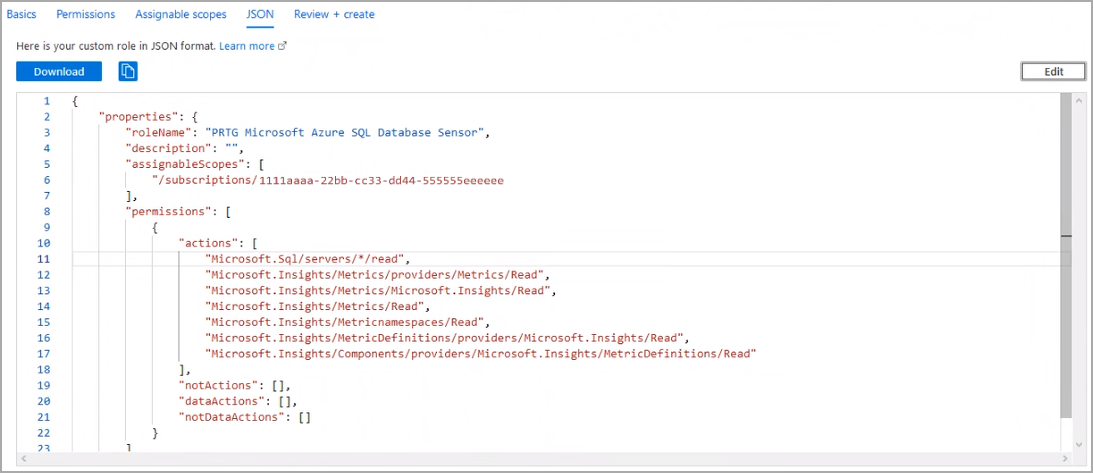
Click to enlarge.
- Click Review + create to review your settings.
- After review, click Create to create the custom role.
Step 2: Assign a role
After you created a custom role, this role needs to be assigned to your newly created application. Take the following steps:
- Back on the Access control (IAM) tab, select Role assignments.
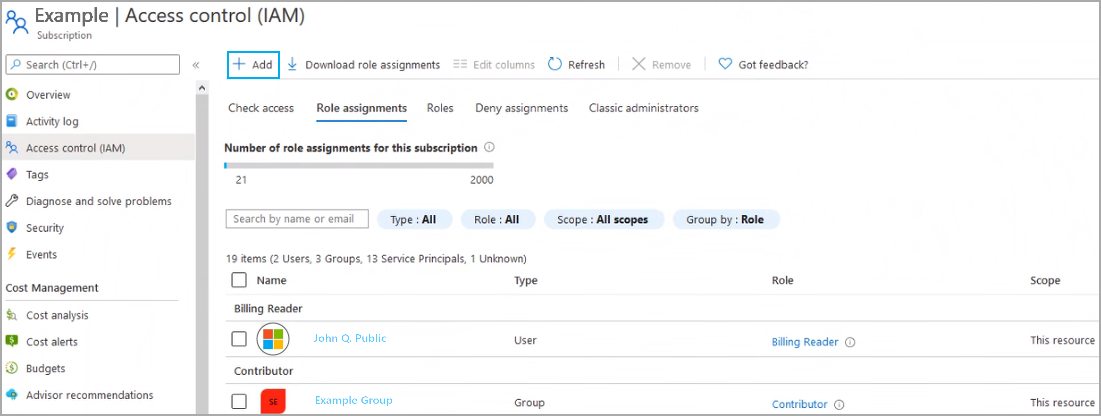
Click to enlarge.
- Click Add and select Add role assignment from the dropdown menu.

Click to enlarge.
The Add role assignment dialog opens.
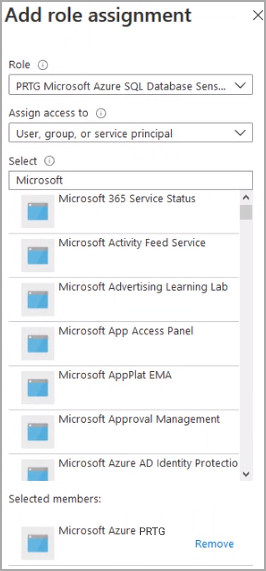
Click to enlarge.
- Select the Role that you created earlier.
- Leave the Assign access to setting as it is.
- Under Select, choose the new application that you created and registered earlier (see section Step 1: Get the client ID and the tenant ID), for example, Microsoft Azure PRTG.
- Click Save.
You have successfully created and assigned a custom role.

Click to enlarge.
JSON for custom roles for the Microsoft Azure sensors
Microsoft Azure Virtual Machine sensor
Here you can find the JSON with the required permissions for the Microsoft Azure Virtual Machine sensor:
{
    "properties": {
        "roleName": "PRTG Microsoft Azure Virtual Machine Sensor",
        "description": "This role has the required permissions to use the Microsoft Azure Virtual Machine sensor of PRTG.",
        "assignableScopes": [

        ],
        "permissions": [
            {
                "actions": [
                    "Microsoft.Network/publicIPAddresses/read",
                    "Microsoft.Network/virtualNetworks/read",
                    "Microsoft.Network/loadBalancers/read",
                    "Microsoft.Network/networkInterfaces/read",
                    "Microsoft.Compute/virtualMachines/*/read",
                    "Microsoft.Insights/Metrics/providers/Metrics/Read",
                    "Microsoft.Insights/Metrics/Microsoft.Insights/Read",
                    "Microsoft.Insights/Metrics/Read",
                    "Microsoft.Insights/Metricnamespaces/Read",
                    "Microsoft.Insights/MetricDefinitions/providers/Microsoft.Insights/Read",
                    "Microsoft.Insights/Components/providers/Microsoft.Insights/MetricDefinitions/Read"
                ],
                "notActions": [],
                "dataActions": [],
                "notDataActions": []
            }
        ]
    }
}
Microsoft Azure Subscription Cost sensor
Here you can find the JSON with the required permissions for the Microsoft Azure Subscription Cost sensor:
{
    "properties": {
        "roleName": "PRTG Microsoft Azure Subscription Cost Sensor",
        "description": "This role has the required permissions to use the Microsoft Azure Subscription Cost sensor of PRTG.",
        "assignableScopes": [

        ],
        "permissions": [
            {
                "actions": [
                    "Microsoft.Consumption/*/read",
                    "Microsoft.Consumption/*/action",
                    "Microsoft.CostManagement/query/read",
                    "Microsoft.Billing/*/read"
                ],
                "notActions": [],
                "dataActions": [],
                "notDataActions": []
            }
        ]
    }
}
Microsoft Azure SQL Database sensor
Here you can find the JSON with the required permissions for the Microsoft Azure SQL Database sensor:
{
    "properties": {
        "roleName": "PRTG Microsoft Azure SQL Database Sensor",
        "description": "This role has the required permissions to use the Microsoft Azure SQL Database sensor of PRTG.",
        "assignableScopes": [

        ],
        "permissions": [
            {
                "actions": [
                    "Microsoft.Sql/servers/*/read",
                    "Microsoft.Insights/Metrics/providers/Metrics/Read",
                    "Microsoft.Insights/Metrics/Microsoft.Insights/Read",
                    "Microsoft.Insights/Metrics/Read",
                    "Microsoft.Insights/Metricnamespaces/Read",
                    "Microsoft.Insights/MetricDefinitions/providers/Microsoft.Insights/Read",
                    "Microsoft.Insights/Components/providers/Microsoft.Insights/MetricDefinitions/Read"
                ],
                "notActions": [],
                "dataActions": [],
                "notDataActions": []
            }
        ]
    }
}
Microsoft Azure Storage Account sensor
Here you can find the JSON with the required permissions for the Microsoft Azure Storage Account sensor:
{
    "properties": {
        "roleName": "PRTG Microsoft Azure Storage Account Sensor",
        "description": "This role has the required permissions to use the Microsoft Azure Storage Account sensor of PRTG.",
        "assignableScopes": [

        ],
        "permissions": [
            {
                "actions": [
                    "Microsoft.Storage/storageAccounts/read",
                    "Microsoft.Insights/Metrics/Read"
                ],
                "notActions": [],
                "dataActions": [],
                "notDataActions": []
            }
        ]
    }
}


Add comment