This article applies as of PRTG 24
Configure PRTG OPC UA sensors to use secure communication channels with self-signed client certificates
Using an OpenSSL certificate with PRTG ensures certain security measures are in place:
- Encryption of all data during transfer
- Integrity of the transferred data
- Prevention of machine-in-the-middle attacks
How to create your own self-signed client certificate
If you want to create a self-signed client certificate to use with your OPC UA credentials in your device or group settings, follow the steps below to download and execute the script that we provide in this article.
How it works
We provide a PowerShell script that creates an opcua folder with the client certificate and client certificate key. You can use the certificate and certificate key in your OPC UA credentials in PRTG. The client certificate and certificate key files are PEM files.
Note: You must run PowerShell as an administrator to run the script successfully.
Step 1. Download the script and save it in your PRTG program directory
1. Download the script: create_client_cert.ps1
2. Save the downloaded script in the \cert folder in your PRTG program directory. The default path of this file is %programfiles(x86)%\PRTG Network Monitor\cert.
Step 2. Execute the script
- Open PowerShell with administrator privileges. To do this, right-click the Windows PowerShell application and select Run as Administrator.
- Navigate to the \cert folder where you saved the create_client_cert script. For example, use the command:
cd "C:\Program Files (x86)\PRTG Network Monitor\cert"
- Run the script with the command:
.\create_client_cert.ps1
- The script prompts you to enter a Private key password. Enter a strong password and record the password somewhere as you will need it again to configure your OPC UA credentials in the PRTG web interface. Click Enter.
- Go to the \cert folder in your PRTG program directory. There is an opcua folder that contains two files: opcua_sensor_cert and opcua_sensor_key. These are the self-signed client certificate and certificate key, respectively.
Step 3. Configure your PRTG settings
- In the PRTG web interface, navigate to the device or group you want to enter OPC UA credentials for.
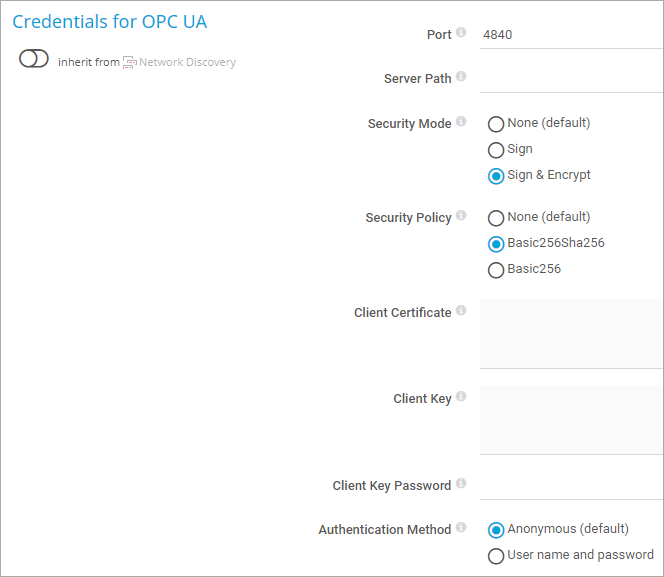
- In the device or group settings, find the Credentials for OPC UA setting and disable inheritance via the toggle.
 Click to enlarge.
- Select Sign or Sign & Encrypt and the appropriate security policy that you want to use.
- In Client Certificate, copy and paste all the contents from opcua_sensor_cert.
- In Client Key, copy and paste all the contents from opcua_sensor_key.
- In Client Key Password, enter the password you set in Private key password in Step 2.
- Save your changes.
You have successfully created a self-signed client certificate and configured PRTG to securely connect with your OPC UA server.

Add comment