What is this?

This knowledgebase contains questions and answers about PRTG Network Monitor and network monitoring in general.

Learn more

PRTG Network Monitor

Intuitive to Use. Easy to manage.
More than 500,000 users rely on Paessler PRTG every day. Find out how you can reduce cost, increase QoS and ease planning, as well.

Free Download

Top Tags


View all Tags

How do I obtain credentials and set permissions for the Microsoft 365 Service Status sensors?

Votes:

0

I want to set up the Microsoft 365 Service Status sensor or the Microsoft 365 Service Status Advanced sensor to monitor the status of the services of a Microsoft 365 subscription.
For these sensors to work, I have to define credentials for Microsoft 365 in my PRTG installation and set permissions for Microsoft Graph.

Where do I get these credentials? How do I set the required permission?

api azure azure-ad credentials microsoft-365 office-365 permissions prtg

Created on Aug 18, 2020 5:58:19 AM by  Maike Guba [Paessler Support] (2,404) 2 1

Last change on Jan 5, 2023 8:22:03 AM by  Brandy Greger [Paessler Support]


16 Replies

Accepted Answer

Votes:

2

This article applies as of PRTG 23

Credentials for Microsoft 365 and permissions for Microsoft Graph

Before you can set up the Microsoft 365 Service Status sensor or the Microsoft 365 Service Status Advanced sensor, you need to define credentials for Microsoft 365 in the settings of a parent object.

The credentials you need are the Tenant ID, the Client ID, and the Client Secret. You obtain the credentials in the Microsoft Azure Portal. There you can also set the permission that the Microsoft 365 sensors require to read data from Microsoft Graph.


The following step-by-step guide shows you how to obtain the necessary credentials and how to set the required API permission.

Log in to the Microsoft Azure Portal and follow the steps below:

  • Step 1: Get the client ID and the tenant ID
  • Step 2: Get the client secret
  • Step 3: Set the permission for Microsoft Graph
  • Step 4: Authorize the new application (Admin consent required)

Step 1: Get the client ID and the tenant ID

Take the following steps to register your application with Microsoft Entra ID to be assigned a client ID. You can use either the Azure Portal or the Microsoft Entra admin portal. The only difference is how you navigate to App registrations:

Using the Azure Portal: Open Microsoft Entra ID in the Microsoft Azure Portal and go to the App registrations tab.

Using the Microsoft Entra admin center: Go to the App registrations tab under Applications.

  1. Click New registration to open the Register an application dialog.
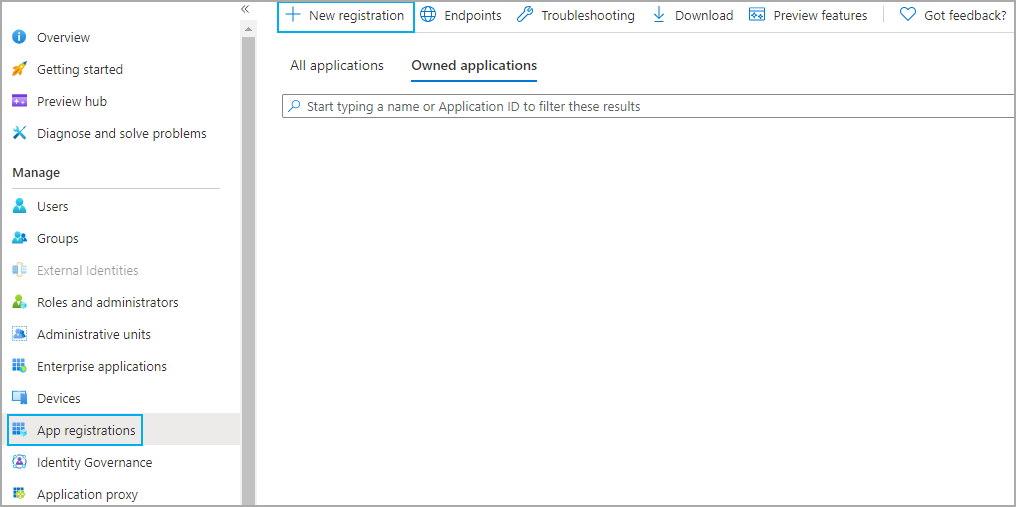
    App Registrations Tab
    Click to enlarge.
    • Enter a display name, for example, Microsoft 365 Service Status.
    • Leave all other settings as they are.
    • Enter the redirect URI where the authorization server sends you after the registration and authorization of the app. This is required for most authentication scenarios and can be specific for your setup. Note that there are specific rules for the redirect URI.

      Note: Enter login.microsoftonline.com if you have no specific redirect URI.
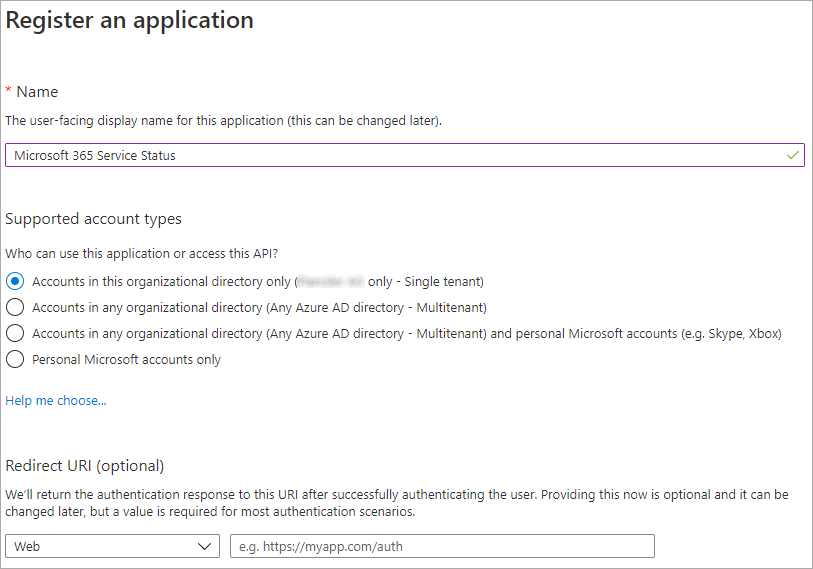
      Register application
      Click to enlarge.
  2. Click Register to register the new application.
  3. The Overview tab of the newly registered application opens.
    New application
    Click to enlarge.
  4. Copy the Application (client) ID and the Directory (tenant) ID and enter them in the credentials for Microsoft 365 section in the settings of the device, group, or probe in or on which you plan to add the sensors.

Step 2: Get the client secret

Take the following steps to create an application password, also known as client secret.

  1. Go to the Certificates & secrets tab.
  2. Click New client secret to open the Add a client secret dialog.
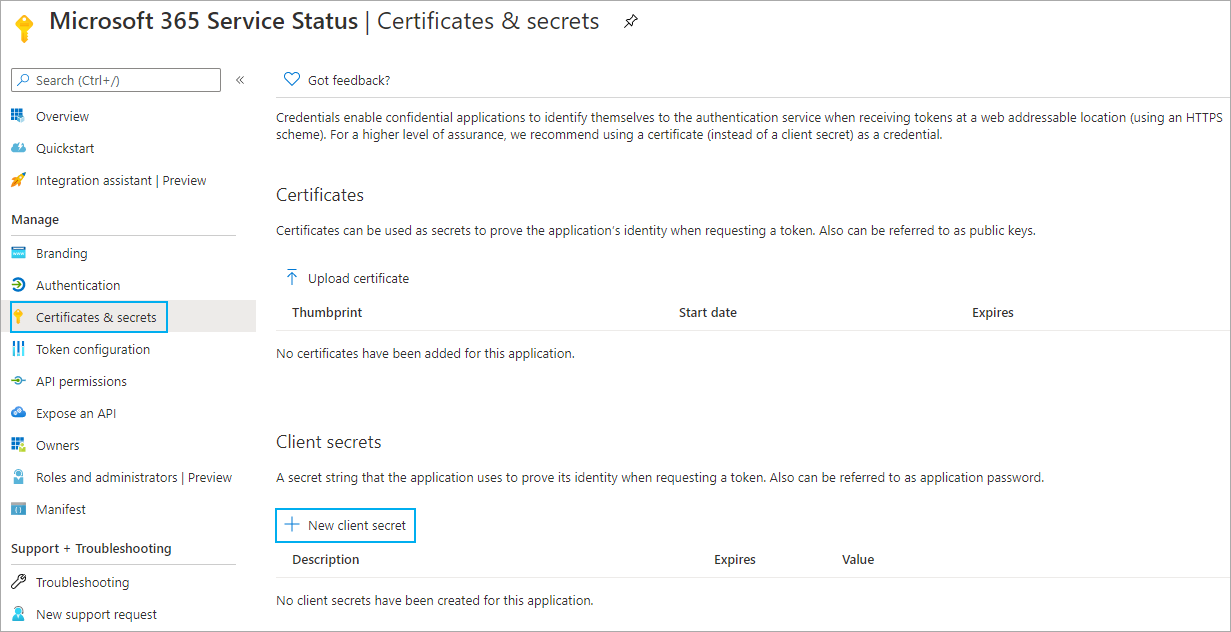
    Certificates & secrets
    Click to enlarge.
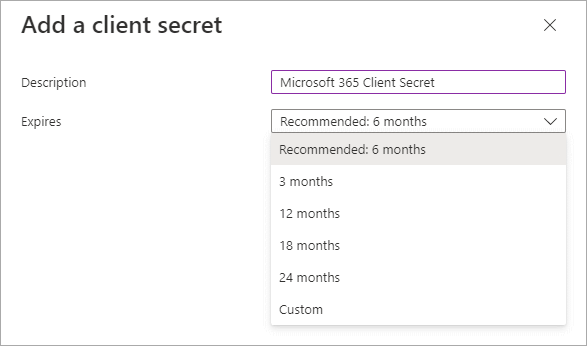
    1. Enter a Description, for example, Microsoft 365 Client Secret.
    2. Select a period after which the client secret expires.New secret
      Click to enlarge.
    3. Click Add to create and display the new client secret for your application.
      Secret display
      Click to enlarge.
  3. Copy the client secret to enter it in the credentials for Microsoft 365 section of the object for which you already added the tenant ID and client ID.
Important notice: Make sure that you directly copy the client secret after you created it. If you leave the page, the client secret is not shown anymore. You have to create a new client secret.

Step 3: Set the permission for Microsoft Graph

Take the following steps to set the required permission for the Microsoft 365 sensors to be able to query data from Microsoft Graph.

  1. Go to the API permissions tab.
  2. Click Add a permission to open the Request API permissions dialog.
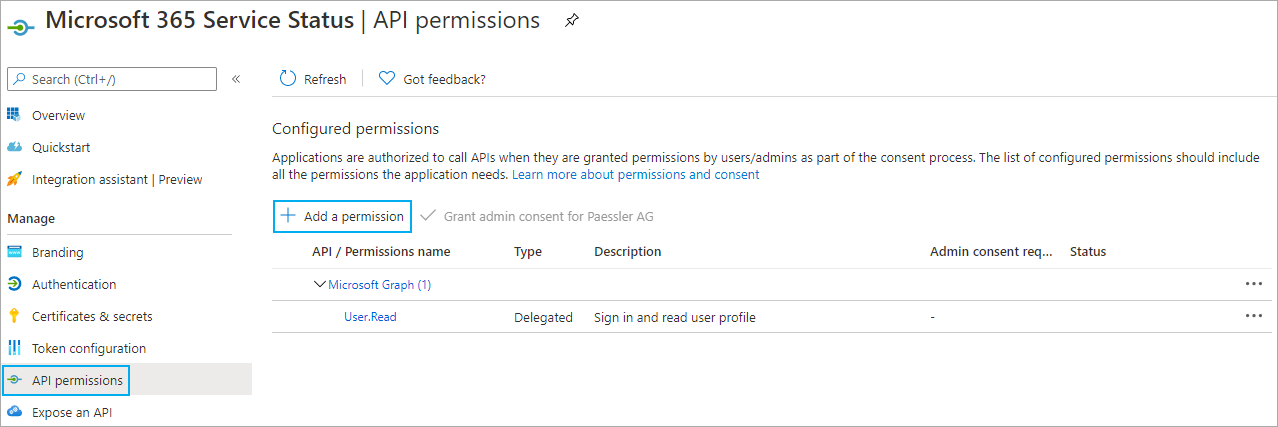
    API permissions
    Click to enlarge.
    1. Select the Microsoft Graph tile.
    2. Click Application permissions.
    3. Enter service in the search bar below Select permissions.
    4. Enable the check box next to ServiceHealth.Read.All.
    5. Click Add permissions to add the required permission.
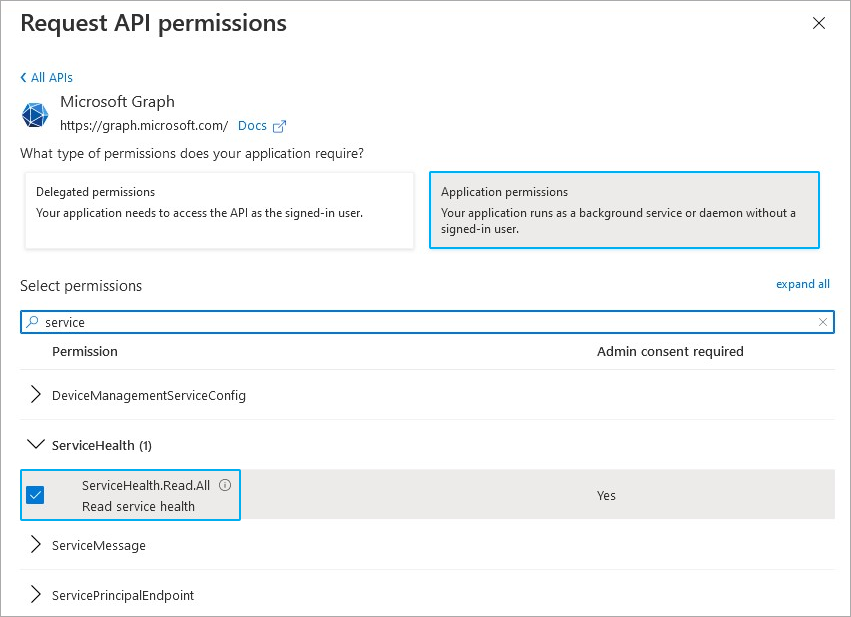
      Permissions dialog
      Click to enlarge.

Step 4: Authorize the new application

Take the following steps to authorize the new application.

  1. Open the following URL
    https://login.microsoftonline.com/your_tenant_ID/adminconsent?client_id= {your_client_ID} and click Accept to accept the request.
  • For your_tenant_ID, enter the tenant ID of the newly created application.
  • For your_client_ID, enter the client ID of the newly created application.
    • Note: You can find the Application (client) ID and the Directory (tenant) ID on the Overview tab of your newly created application.
      New application
      Click to enlarge.

Note: It can take up to a few minutes until the authorization was processed.


You can now create the Microsoft 365 Service Status sensor and the Microsoft 365 Service Status Advanced sensor.

More

Created on Aug 18, 2020 6:05:28 AM by  Maike Guba [Paessler Support] (2,404) 2 1

Last change on Nov 15, 2023 10:46:34 AM by  Jacqueline Conforti [Paessler Support]


Votes:

1

Do you have a PRTG step by step guide on how to do this? The Microsoft.com docs are WAY to generic to be of ANY value.

Created on Aug 25, 2020 3:03:00 PM


Votes:

0

At the moment, there is no step by step guide.


Kind Regards,
Matthias Kupfer

Created on Aug 26, 2020 11:30:19 AM by  Matthias Kupfer [Paessler Support]


Votes:

1

https://team-debold.de/2016/07/22/prtg-office-365-status-ueberwachen/

here is an step by step guide

i try this today and it still works for the new sensor !

Created on Aug 28, 2020 8:29:20 AM


Votes:

0

Hi,

Microsoft's doc has been updated recently and yet the screenshots are still from an old version of the AAD management console ...

Anyway, I've done it all (client ID, tenant ID, secret, api permissions) and yet I'm still getting a 401 unauthorized with this sensor ...

Created on Sep 15, 2020 9:54:48 AM


Votes:

0

Please check again if you have set the permissions as described in the article How do I set permissions for the Office 365 Management APIs. If the permissions do not look like the ones shown in the screenshot in the article, please use the "Add a permission" button to add them.


Kind regards,
Sasa Ignjatovic, Tech Support Team

Created on Sep 16, 2020 9:19:13 AM by  Sasa Ignjatovic [Paessler Support]


Votes:

0

Please create a better guide how to use this sensor. It's quite difficult to go thru your documentation.

Created on Oct 19, 2020 3:34:10 PM


Votes:

0

Thank you for your feedback.

Currently this is the only guide we have on how to set up credentials for Azure AD, however we will try to improve it so that it is easier to follow.


Kind regards,
Sasa Ignjatovic, Tech Support Team

Created on Oct 20, 2020 5:33:39 AM by  Sasa Ignjatovic [Paessler Support]


Votes:

0

I followed these steps but ran into this error when performing: Step 4: Authorize the new application

ERROR: AADSTS500113: no reply address is registered for the application

There is one final step missing: - Under "Authentication," you need to click on "Add a platform" - You then choose the "Web" box - In the Redirect URIs box, need to add the first part of the URL string that was listed in step 4: i.e. https://login.windows.net

Once you add this in and save, then the authorisation works fine

Created on Dec 23, 2020 4:47:40 AM


Votes:

0

Hello

In Step 4 you need to browse to the URL https://login.windows.net/common/oauth2/authorize?response_type=code&resource=https%3A%2F%2Fmanage.office.com&client_id={your_client_id}

But when I use the client ID I get the following error:

AADSTS70001: Application with identifier 'xxxxxxx' was not found in the directory abc.onmicrosoft.com

However a third party forum and user question pointed me in the right direction and suggested that {your_client_id} should be replaced by the AppPrincipalId and not the secret client ID. You can find the application ID via powershell by running the command(s):

(Connect-MsolService)
Get-MsolServicePrincipal

Or in the M365 GUI in the overview page of the app registration you created...

Probably a stupid mistake but I'm just posting this here so others don't make the same mistake as I did :)

Created on Feb 9, 2021 10:19:14 AM

Last change on Feb 9, 2021 11:53:07 AM by  Felix Wiesneth [Paessler Support]


Votes:

0

Hello - Had the hardest time getting the Office365 sensor working. Tenet ID, Client ID and Client Secret all matched with what we had in the portal. Turns out we needed the VALUE of the Secret ID. Not the Secret ID designation.

Click on this link and scroll to the bottom to see the real value to put in the "Credentials for Microsoft 365"

https://docs.microsoft.com/en-us/answers/questions/323082/problem-using-postman-to-call-rest-apis-34error-de.html

Created on Jun 9, 2021 3:23:24 PM


Votes:

0

We also had trouble loggin in. sign-in error code 7000215 We were successful using "Value" instead of "Secret IT" as a Client Secret. Hope that helps anyone.

But I still have problems with a few sensors, e.g. "Microsoft 365 Service Status" => invalid map<K

Created on Jun 9, 2021 4:19:55 PM

Last change on Jun 10, 2021 7:20:10 AM by  Felix Wiesneth [Paessler Support]


Votes:

0

@idivitj Thank you for sharing your solution. :)

@bsc This is a known issue, and we are working on a solution for this. A fix for this is planned to be released in the PRTG version 21.x.69 (coming in July).


Kind regards,
Sasa Ignjatovic, Tech Support Team

Created on Jun 10, 2021 6:02:35 AM by  Sasa Ignjatovic [Paessler Support]


Votes:

0

Hello, i'm getting this error random when collecting sensor data: The request has failed. Request failed: HTTP request was not successful: 500: Internal Server Error

Sometimes it shows the state of the sensor, sometimes this error.

Any ideas?

Created on Aug 18, 2021 6:23:54 AM


Votes:

1

Step 4. Authorise the permissions for Graph wasn't working for me using the link. "https://login.windows.net/common/oauth2/authorize?response_type=code&resource=https%3A%2F%2Fmanage.office.com&client_id={your_client_id}". I was able to authorize the permission in the azure console. Using the control "Grant admin consent for .... " under API permissions.

Created on Dec 30, 2021 11:18:25 PM


Votes:

0

As per psionix above, the URL is not correct for the Microsoft Graph API permissions because it is this is no longer using the Office 365 Management API. You will need to grant consent as mentioned above or, try this URL to grant Organisation consent - https://login.microsoftonline.com/{tenant-id}/adminconsent?client_id={client-id}

Created on Jan 10, 2022 8:28:13 AM


Disclaimer: The information in the Paessler Knowledge Base comes without warranty of any kind. Use at your own risk. Before applying any instructions please exercise proper system administrator housekeeping. You must make sure that a proper backup of all your data is available.