In the PRTG apps for iOS and Android, PRTG can show alerts and whether they are acknowledged or not. However, you cannot see your team members who are on call in case you get, for example, a critical alert and you are no expert on the matter. Is it therefore possible to integrate Derdack SIGNL4 into PRTG? What steps do I have to take?
How can I integrate Derdack SIGNL4 into PRTG?
Votes:
0
1 Reply
Votes:
0
This article applies as of PRTG 21
Integration of Derdack SIGNL4 into PRTG
Derdack SIGNL4 is a mobile alerting tool that offers multiple notification channels to make sure that alerts, in this case notifications from PRTG, are received, acknowledged, tracked, and escalated. To alert the right team members at the right time, it is possible to integrate duty and shift scheduling. Team members can also communicate within an alert to collaborate on an issue. You can integrate SIGNL4 into PRTG via webhooks and emails.
Option 1: Integration via webhook
Configure PRTG
- Log in to the PRTG web interface.
- Select Setup | Account Settings | Notification Templates from the main menu.
- Hover over the plus button on the right side and click Add Notification Template.

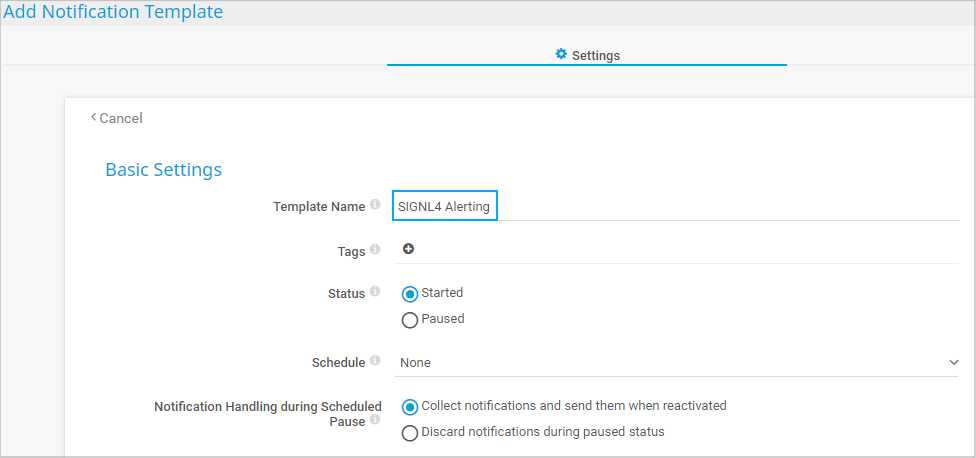
Click to enlarge. - Enter a Template Name, for example, SIGNL4 Alerting.

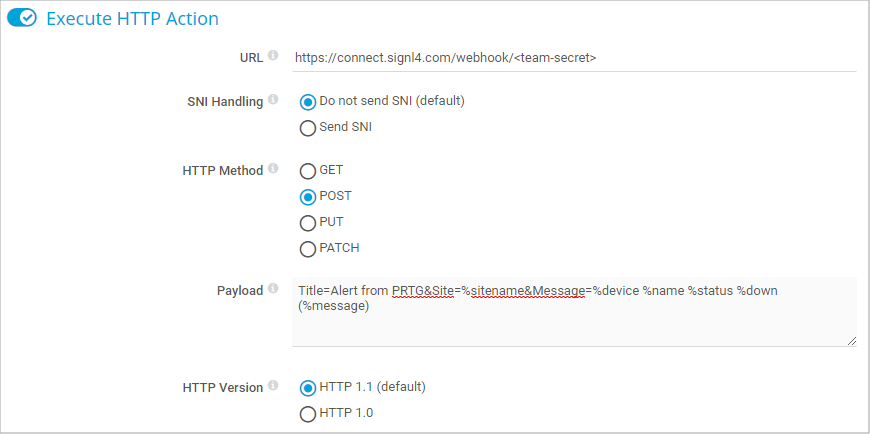
Click to enlarge. - Scroll down to the notification methods and enable the method Execute HTTP Action. Then do the following:
- In the URL field, enter the SIGNL4 webhook URL where <team-secret> is the SIGNL4 team secret:
https://connect.signl4.com/webhook/<team-secret> - Select POST as HTTP Method.
- Enter the Payload with the according placeholders in the format parameter1=value1¶meter2=value2. The payload can look like this:
Title=Alert from PRTG&Site=%sitename&Message=%device %name %status %down (%message)For more information about available placeholders, see also the PRTG Manual: List of Placeholders for Notifications. - Click Create.

Click to enlarge.
- In the URL field, enter the SIGNL4 webhook URL where <team-secret> is the SIGNL4 team secret:
- Navigate to the sensor that you want to create a notification for in case of an alarm.
- Select the Notification Triggers tab.
- Hover over the plus button on the right side and select Add State Trigger.

Click to enlarge. - Configure the state trigger according to your needs. Make sure that you set the previously configured notification template SIGNL4 Alerting as the action for the first condition, and, optionally, the notification template for the alert resolution as the action for the last condition. For more information about the alert resolution, see section Optional: Alert resolution below.

Click to enlarge. - Click the blue check mark to save your settings.
Optional: Alert resolution
To support the resolution of alerts in SIGNL4, create a second notification template with the notification method Execute HTTP Action as previously described. Configure the notification template as follows:
- In the URL field, enter
https://connect.signl4.com/webhook/<team-secret>?ExtIDParam=sensorid&ExtStatusParam=laststatus&ResolvedStatus=Up<team-secret> is your SIGNL4 team secret. - As Payload, enter
Title=%device: %name&Message=%message&sensorid=%sensorid&laststatus=%laststatusFor more information about the resolution of alerts in SIGNL4, see https://www.signl4.com/blog/update-july-2020-resolve-alerts/.
Option 2: Integration via email
- Log in to the PRTG web interface.
- Select Setup | System Administration | User Accounts from the main menu.
- Hover over the plus button on the right side and select Add User.

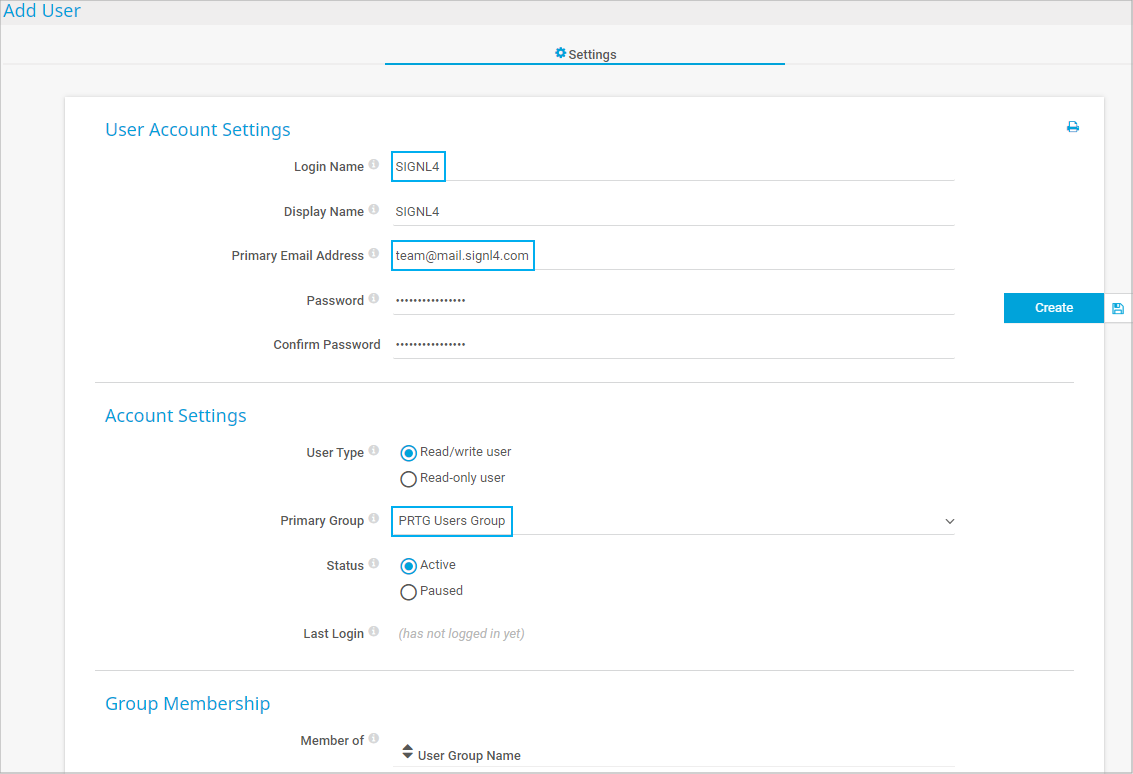
Click to enlarge. - In the Add User dialog, do the following:
- Enter SIGNL4 as Login Name and User Name.
- As Primary Email Address, enter your SIGNL4 team email address.
- Enter a Password and confirm it.
- In section Account Settings, select a Primary Group from the dropdown list. In our example, this is the PRTG Users Group but you can assign the new user to any other group that you created and that has the necessary access rights. For more information, see the PRTG Manual: Access Rights Management.

Click to enlarge.
- Leave all other settings as they are and click Create.
More
Created on May 10, 2021 2:29:45 PM by
Maike Guba [Paessler Support]
(2,404)
●2
●1
Last change on May 26, 2021 5:21:50 AM by
Maike Guba [Paessler Support]
(2,404)
●2
●1
Add comment